You've come to right place if you ever wanted to make wood-carved caricatures. This section will teach you about safety, design, and techniques. It is possible to transform a basic caricature into something extraordinary. For those who are unsure where to start, here are some ideas to make your caricature truly unique. There's also the option of taking classes from caricaturists.
Techniques
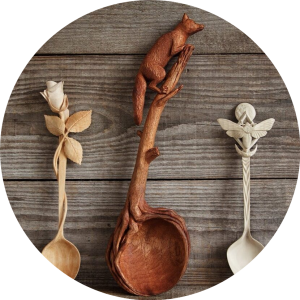
Wood carving caricatures offer a unique way to create sculpture. They're amusing and can tell a story without words. Caricature refers to a distorted representation of a human being. Wood carving carvers, like Dave Stetson, adhere to a strict code of realism and have certain rules that should be followed to create an effective caricature. This article will discuss the basics and give some tips for creating a caricature.
First, it is important to focus on the technique for carving an astronaut. The two most delicate tools for carving an astronaut are the whittling or spoon knives. To make the job easier, you can use templates while you are carving the astronaut. A good tutorial will show you how to create your caricature. A tutorial on this subject might be worth your consideration if you are tight on budget.
Designs
There are many ways to create amusing wood carved caricatures. You can start by using a pattern. You can also purchase a cardboard cutout and use the same patterns for carving different types of caricatures. You can also use the tutorial to carve a caricature. This article will introduce you to some of the best designs and techniques of carving a caricature.
The first caricature that Fred made was called 'Aristocrats of the Roads'. It depicted two men-wanderers. It was made out of Honduras Mahogany. Fred entered it to competitions, and won numerous awards. He also featured it in the Chipping Away Catalog. Fred also carved a caricature Luciano Pavarotti in 2009, earning him the Second Runner-Up Award at a national woodcarving convention.
Eyes
The first thing to remember when carving caricatures of people is to make sure the eyes look realistic. A realistic-looking eye is fine, but a poorly executed caricature can leave viewers dissatisfied. You can take a photo of an existing carving and follow the steps to make sure your eyes match.
Next, determine the shape of your eyes before carving them. Some carvers work with the same shape of eyes as others. To create more realistic eyes, others use different shapes. Stop cuts are a way to create symmetrical eyes. You will need to cut the pupil and the inner iris. You can now move on to the next stage of carving the caricature.
Safety
Wood carving caricatures are unique in their designs. They tell stories without the use of words. Artists who create them take great pride in their accuracy. Caricatures are usually depictions that exaggerate people or things to convey an impression. Wood carving carver Dave Stetson has established strict rules for carver safety and quality, as well as providing information for consumers.
Before you begin carving a caricature of a person, make sure to clean the surface and get rid of any pencil marks. You can clean the surface with water or dish soap. To carve the neck and head, use a V-shaped 60 degree tool. A 60-degree V shape tool is useful for carving, as it cuts wood easily. The Ramelson 60 degree V-shaped carver tool is a good choice. It is both sharp and simple to use.
Materials
Carving animals can be fun and challenging. Learn how to make caricatures using wire and wood. While animal caricatures may not be as elaborate as human caricatures, they are still fun and can convey a story without the use of words. Caricatures can be exaggerated to evoke realism. While carving caricatures is a difficult hobby for beginners, it can be very rewarding for those who are more experienced.
A wood board and chisels are the two main materials that you need for carving. You will also need a hammer. The first layer of paint is acrylic white paint, which you can buy at a craft store. After the base layer has been completed, you can start the second layer. This layer will consist of a golden brown paint and a few drops of burnt sienna (Academy). For the face, use 2 drops sunkissed purple.
FAQ
Is it possible to open my own woodworking shop?
It is difficult to start your own woodworking company. There are lots of legal requirements and regulations that you'll need to follow. You don't have to go through all that hassle of setting it up. Many people opt to join existing businesses instead. This way, you only need to pay membership fees and taxes.
How do I choose the right tools for me?
It's important that you consider your needs and preferences while shopping for tools. Do you prefer metal handles or plastic? What size of nails and screws do your hands use most? Are you comfortable with power tools, or would you rather use hand tools?
What are the basics of woodworking?
The best way to learn how furniture construction is to make your own bench. This project can be completed with whatever wood you have available at home. If you're not sure which kind of wood to choose, you can purchase cheap pine boards at Lowes and Home Depot. After building your bench, sand off any rough edges and apply a stain or varnish.
Where do I start with woodworking?
The best way to learn how to build furniture is by building furniture. You'll need tools, and you'll have to make mistakes along the way, but if you keep at it, you'll eventually figure out what you're doing.
Choose a project that interests you. It can be as simple as a small box, or as complex as a complete entertainment center. Once you've settled on a project find a local skilled woodworker. Ask the local woodworker for help in deciding what tools and where to get them. Ask if you can find someone who does this kind work.
Are you able to teach yourself woodworking
It is best to do it yourself. Woodworking is an art that takes patience, practice, skill and experience. Every craft takes practice and patience.
The best way to learn how to do something is actually to do it. Start small and learn from your mistakes.
Statistics
- If your lumber isn't as dry as you would like when you purchase it (over 22% in Glen Huey's opinion…probably over 10-15% in my opinion), then it's a good idea to let it acclimate to your workshop for a couple of weeks. (woodandshop.com)
- Overall employment of woodworkers is projected to grow 8 percent from 2020 to 2030, about as fast as the average for all occupations. (bls.gov)
- Most woodworkers agree that lumber moisture needs to be under 10% for building furniture. (woodandshop.com)
- Average lumber prices rose about 600 percent between April 2020 and May 2021. (familyhandyman.com)
External Links
How To
Here are some tips on how to drive nails in wood
The first step in driving a nail into wood is to choose the correct size and type of hammer. There are many types of hammers that you will find: claw hammers and sledgehammers; mallets; ball peen hammers; and hatchets. Each kind of hammer has its own advantages and disadvantages. A clawhammer works best when hitting something hard like nails. However, it can sometimes be difficult to see exactly where the strike is going. The sledgehammer works well for large areas, but is too heavy for smaller tasks.
Once you have chosen the right hammer for you, put your hand flat against its side so that it rests comfortably in the palm of your hand. Take the handle and hold it with both hands. But don't press down so hard you injure yourself. Hold the hammer straight up, keeping your wrist relaxed. Then swing the hammer back toward the ground, aiming for the center of the nail. You should feel the impact from the hammer striking a nail. You can practice swinging the hammer with a block or wood until you feel the rhythm.
Hold the hammer near your body until you're ready for the nail to be driven. To ensure that the nail is perpendicular on the surface of the wooden floor, position it. Your eyes should be focused on the nail's tip. Move the hammer forward and then continue to move the hammerhead. Keep doing this until you are comfortable with the swing. After mastering the technique, you can add power to your swings. You can hold the hammer over your shoulder and forcefully bring it down. You'll have more energy to work with.
After you have nailed the hole, take the hammer off the nail. The rest of the nails can be pulled out using a screwdriver, pry bar, or a hammer. To avoid splitting the wood, make sure the nail heads are not touching the board's surface.