If you are considering learning how to make ornaments, you may want to check out the classes offered at your local community college. There are many crafts to choose from, and woodturning is no exception. A wooden spoon or bowl can be turned into a Christmas tree ornament. Here are some tips for beginners. Find a class that you like. If you love intricate woodturning designs, woodturning could be the right choice.
Dale L. Nish
Dale L. Nish was one of the most important woodturners in the United States. He has been teaching the art and demonstrating it to people for over 40 years. Woodturning with Ray Allen is his latest book. Other books written by Dale L. Nish include Creative Woodturning, Artistic Woodturning, and Mastering the Art of Woodturning.
Dale L. Nish's Woodturned Christmas Ornaments demonstrates the steps needed to create stunning, sculptural ornaments. This comprehensive guide has color photographs and detailed plans. Expert tips are also included on how to use templates. This book includes ornament ideas by top woodturners. This book is essential to anyone looking to create stunning wooden ornaments this holiday season.
Dick Sing
Dick Sing's book provides step-by, detailed instructions on how to create different kinds of wooden ornaments. You will find a variety color photos throughout the book to help you navigate each project. There are also helpful tips and tricks for choosing the right woods. You'll also get lots of ideas for Christmas gifts and dozens of woodturning ornaments that make great gifts for everyone on your list.
Dick began woodturning demonstrations in Racine, WI, as an aspiring woodturner. His first demonstration brought about a lot of sweat underneath his lathe. Soon Dick began to receive requests for demonstrations at craft shops, art fairs, and festivals throughout the country. He was even called by a California club. The rest is history. Dick Sing has been teaching and demonstration woodturning since 1989.
Acacia trio
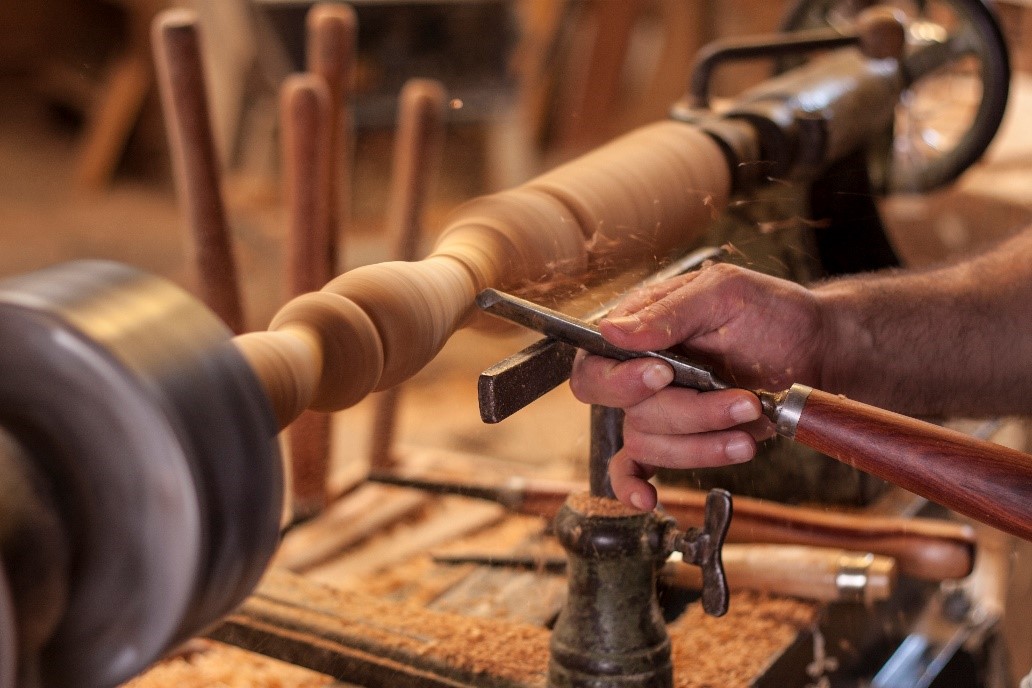
Acacia is a set of three woodturning ornaments made from sea urchin shells. It also features ebony finials. Each piece is approximately 7 in. long and hangs from a monofilament. You will need to use a drill and a small bit. Start by measuring the width of the ornament you want, then marking the center with a square. Next, slide the spur into place against the spindle. Once you have the wood placed, turn the lathe. Begin turning with a roughing-gouge. After that, use a sanding block to smoothen out the edges.
Sputnik
Sputnik Sea Urchin handturned ornaments are a great gift idea that will last for many years. Its distinctive horn-like protrusions will draw attention to the recipient and have wavy color patterns. The shell is fashioned to fit the finial, which is made of maple or bloodwood and finished with multiple layers of protective spray clear enamel. The space-themed ornaments are perfect for any occasion and will make a great conversation piece.
To purchase, visit the Met Opera Shop to find wooden ornaments inspired by Sputnik chandeliers. These ornaments measure 3-1/2 inches in diameter and come with a gold ribbon to tie it all together. You can purchase one or all three ornaments. You can protect your ornaments with one or two of the sets, which include four Sputnik-themed ornaments. They will arrive via USPS Priority Mail Flat-Rate.
Acacia trio by Dale L. Nish

For nearly three decades, Dale L. Nish has made a profound impact on the woodturning industry as an author, teacher, and international speaker. He has presented his work at more than 200 events and published numerous articles. Here, he shares some of his best tips for creating ornaments, including a gallery of his favorite turners' work.
Acacia trio by Dick Sing
This book contains step-by-step instructions and color photographs that demonstrate how to turn an Acacia trio woodturning ornament. The book includes helpful tips and tricks for woodturners starting out, including how to select the right wood and use the appropriate tools. The book also contains a tutorial on how to make hollow, carved wooden eggs. Get a copy of this book today if you want to make these unique ornaments!
FAQ
What is the difference of plywood and particleboard?
Plywood consists of layers made from wood and pressed together by pressure. Plywood comes with a range of thicknesses, and it is most commonly used for flooring and cabinets. Particle board is made of sawdust and resin that has been compressed into large blocks. It's commonly used for home improvement projects. Both types are sturdy and easy to cut.
What is the hourly rate for a woodworker?
Hourly rates for professional woodworkers vary depending on many factors such as skill, experience, availability, geographical location, and other variables.
The hourly average rate for skilled woodworkers runs between $20-$50.
An hourly rate of $10 for a less skilled woodworker could be possible.
How often should I buy new supplies?
Over time, you may need to replace your tools. If you are using hand tools, you will need to sharpen them frequently. If you are using power tools, you will need to purchase replacement parts regularly. To avoid buying too much at once, try to spread your purchases out over a few months.
How can I keep my shop organized?
To keep your workshop tidy and organized, you should first create a place for tools storage. Make sure your tools are clean and free of debris and dust so they can be used properly. Hang tools and accessories using pegboard hooks.
Statistics
- Woodworkers on the lower end of that spectrum, the bottom 10% to be exact, make roughly $24,000 a year, while the top 10% makes $108,000. (zippia.com)
- Overall employment of woodworkers is projected to grow 8 percent from 2020 to 2030, about as fast as the average for all occupations. (bls.gov)
- Most woodworkers agree that lumber moisture needs to be under 10% for building furniture. (woodandshop.com)
- Average lumber prices rose about 600 percent between April 2020 and May 2021. (familyhandyman.com)
External Links
How To
How to make wood joint
This tutorial will show you how to join two pieces of wood together. We will use the "pockethole joint," which means that we drill holes in the wooden pieces and then glue them together. This works well if the wood is straight and smooth. If your wood isn't straight or flat, you might want to try another method, such as dowel joinery. These are the steps
-
Drill Pocket Hole Joints. First, measure the area where you wish to place the pocket joint. Then drill 3/4 inch deep holes into the ends of each piece of wood using a jig saw or handheld drilling machine.
-
Sand Smooth. The wood's edges can be sanded to prevent splitting.
-
Glue the two sides of the wood together. Apply glue to the sides of both wood. Let it sit for about 5 minutes before clamping the pieces together.
-
Secure the pieces together. After the glue has dried properly, clamp the pieces together to make sure they are flush.
-
Trim Joinery. After the glue dries completely, trim off any excess wood around the joint.
Be sure to leave enough space between each piece so that they can be turned inside-out.