It can be difficult cutting rough lumber and loading it into your car is not easy. Take your handsaw and tape measure along with you to the shop. In case your board does not fit, you can purchase additional boards. Make sure you have the right knots and checks on your board. Otherwise, they might not fit as well as you would like. It's not worth ripping a board and starting over. It will take time and cost you money. So, it is a good idea to buy a few extra boards.
Minimal wastage
A sawmill will typically turn 59% of the log volume into boards when it cuts rough lumber. The remainder of the log can be considered waste, including sawdust, bark, chips and chips. A less-than-perfect cut results in more waste, but it should still be less than 20%. Here is a simple formula that will estimate how much wood has been wasted in a given board. For a 4-foot board, the sawmill must remove 18% from its volume to obtain the desired lumber thickness.
For one, rough lumber is rarely available in uniform dimensions. The dimensions of hardwood bought from a big box store are often known, allowing you to plan your project around the standard size. This means that the edges of rough lumber are not always straight, which can lead to waste. Furthermore, rough-cut lumber usually requires a common width, which causes a lot of wasted lumber. These wastes can't be recycled later.

Preparation
To prepare for cutting rough lumber, the first step is to measure the length. Rough lumber may not be perfectly flat when it arrives from the lumber yard. It may also not have parallel faces and edges, and may require several passes to flatten. The rule of thumb is 1/16" per pass. If the lumber has concave surfaces, run it through the saw with the concave surface down.
The rough cut lumber should generally be flattened to 1/4" before the saw cuts. After flattening the face, plane to the thickness of the finished board. Once you have the thickness of the rough lumber, measure the finished width and length. Be aware of any imperfections and plan accordingly. Make sure to leave at least one-quarter inch of space between each board. Plan your project around the available boards. Do not buy lumber that is uneven. It will be difficult to work on boards that are bowed, warped or twisted.
Cost
There are two types if lumber: rough-sawn lumber and dimensional lumber. Home improvement shops usually sell finished lumber but only rarely rough-sawn. Both types of lumber are typically carried by local sawmills or lumber yards. The main difference is in how much work they need to be processed. A rough-sawn board is a more affordable option because it requires less processing. It is also more flexible than finished lumber in that it can be cut wider and thinner.
While buying lumber from a yard or mill is cheaper, you are less likely than others to find it in standard lengths. Although milling your own lumber is cheaper than buying rough-sawn lumber it can still be an economical option. However, you will need to have enough shop space and more power. Milling equipment is noisy and requires training. If you plan to use your mill, you may want to consider zoning laws in your area.

Source
When buying lumber, you have a number of options. There are different sizes, shapes, cuts, and finishes to choose from. Rough sawn lumber can be described as unfinished and unsanded lumber that is not cut into planks. This lumber is stronger than the other types due to its higher moisture content. However, it is thicker than standard surfaced wood. These are just a few of the many benefits that rough sawn lumber can bring to your woodworking projects.
The first benefit is its availability and low price. Rough lumber isn’t treated and is not typically sold at a hardware retailer. This type of lumber does have its advantages and disadvantages. This lumber is cheaper per board foot but less expensive by volume. Additionally, it takes longer to finish than treated lumber. So, you might want to consider this option when you're deciding how much lumber to buy. If you are planning to use rough sawn lumber in your project, it is worth purchasing a large quantity and a smaller amount for finishing.
FAQ
What is the minimum investment a hobbyist needs to make in order to get started?
If you're looking to start your own woodworking business, you'll probably need some capital to buy the necessary tools and supplies. The best place to start is by buying a small drill press, circularsaw, circular saw or sanding machine. These items aren't very expensive, so you won't break the bank.
What kind of wood should you use?
Woodworking is a popular job that involves oak, pine and maple. Each type of wood has unique characteristics that affect the look and feel of the final product. For example, oak tends to be darker and harder than other woods. Birch is light and soft, while mahogany can be heavier and more dense. There are two options: solid wood and veneers. Veneers are thin sheets or wood that are glued together into one layer.
What types of woods are best for furniture making?
Woods are classified based on their hardness. Softwoods include cedar and pine as well as cedar and cedar. Because they are resistant, they can be used for outdoor furniture. You can find hardwoods like oak, maple, mahogany, teak, and others. They are generally indoors as they don't weather well outside.
What would be your first step in woodworking?
Start with softwood like pine, poplar and ash. Once you feel comfortable with these two, move on to hardwood.
How do I choose the right tools for me?
It's important that you consider your needs and preferences while shopping for tools. Do you prefer metal or plastic handles? What size screws or nails do you prefer? Are you comfortable with power tools, or would you rather use hand tools?
How can I tell what kind of wood I am working with?
Always inspect the label when buying wood. The label should contain information about the wood species, its moisture content, and whether it has been treated with preservatives.
Do I need to be a genius to succeed in woodworking?
No. No. Woodworking isn't rocket science. Anyone can learn to use basic powertools and techniques to create beautiful work of art.
Statistics
- In 2014, there were just over 237,000 jobs for all woodworkers, with other wood product manufacturing employing 23 percent; wood kitchen cabinets and countertop manufacturing employing 21 percent. (theartcareerproject.com)
- Overall employment of woodworkers is projected to grow 8 percent from 2020 to 2030, about as fast as the average for all occupations. (bls.gov)
- The U.S. Bureau of Labor Statistics (BLS) estimates that the number of jobs for woodworkers will decline by 4% between 2019 and 2029. (indeed.com)
- Average lumber prices rose about 600 percent between April 2020 and May 2021. (familyhandyman.com)
External Links
How To
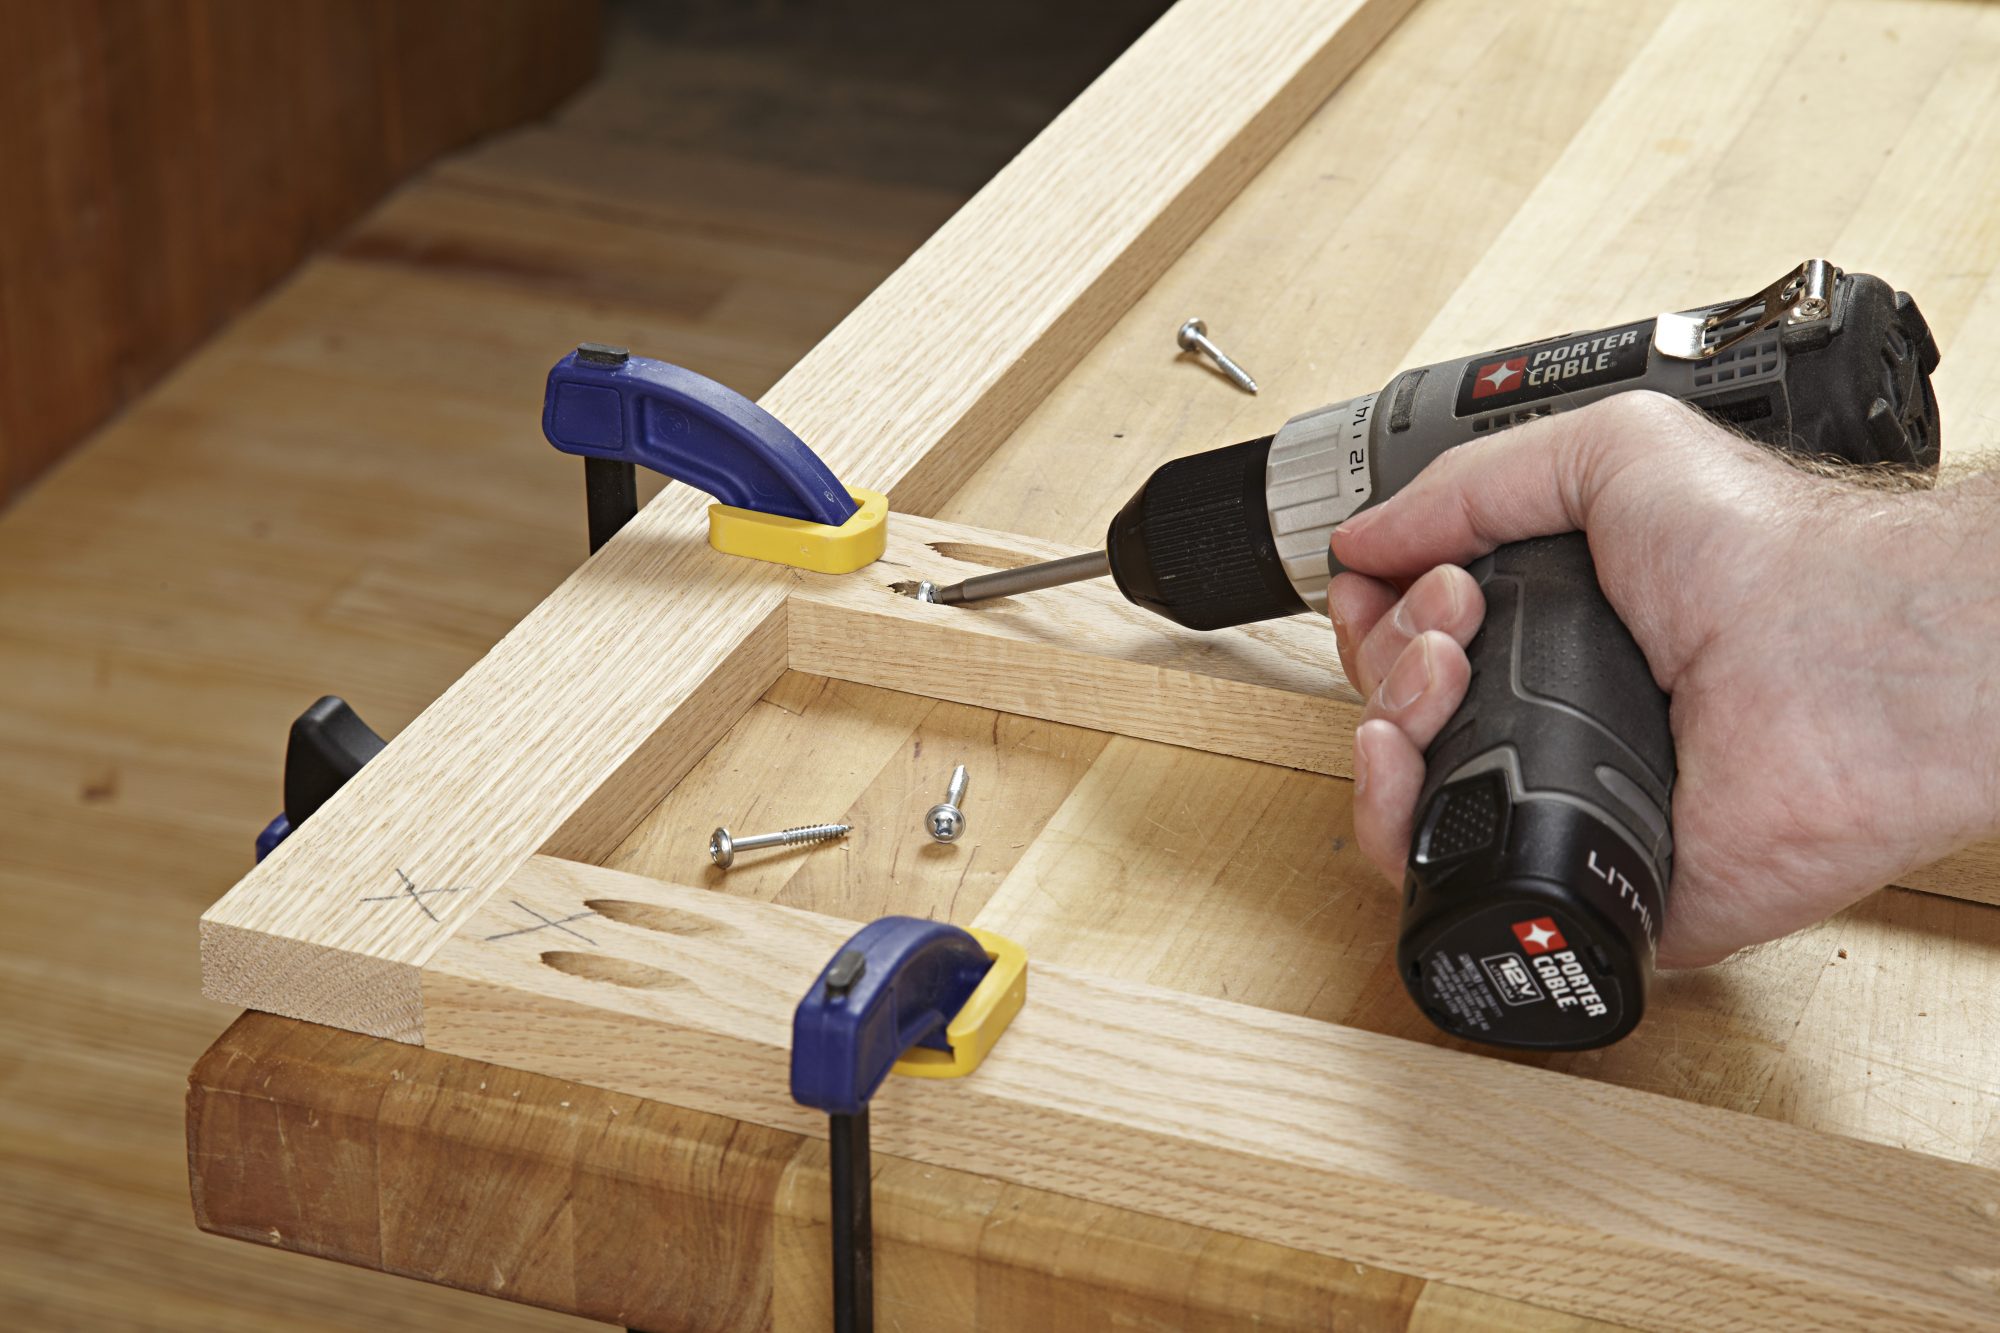
How to make wood joints
This tutorial will show how to join 2 pieces of wood together. The "pocket hole joint" is a method whereby we drill holes into the wood and glue them together. This method is great if your wood's straight and smooth. Dowel joinery might be a better option if your wood is not straight or flat. Here are the steps
-
Drill Pocket Hole Joints. Measure and mark the location where you would like to place the pocket hole joint. With a handheld drill machine or jig saw, drill 3/4-inch deep holes in the ends of each piece.
-
Sand Smooth. Sanding the edges of the wood will help to prevent the joint from splitting later.
-
Glue the two sides of the wood together. Apply glue to both ends of the wood. Allow it to sit for approximately 5 minutes before you clamp the pieces together.
-
Connect the pieces. After the glue has dried thoroughly, secure the pieces so that they are flush.
-
Trim Joinery. Trim the excess wood around the joint after the glue has dried completely.
Make sure to leave enough room between the pieces so that you can turn them inside and out.